Animatronic Eyes
This pair of eyes is my first animatronic project. It was an idea I have had for a while. I did research online for different mechanisms that have been created and modelled my own based on those references. I used Fusion 360 to model the pieces, an Arduino UNO computer to program the motion, and a 3-D printer to make the parts. I tried to make the design as compact as possible so in the future it could be mounted inside a model head with relative ease
Design
I had done some research before beginning my design. Many of the designs I had seen online, I believed were far too bulky, so I had set my goal for a smaller mechanism. I eventually found a model where each eye had servos mounted behind it, which controlled rotation from inside the eye rather than outside. I mimicked that design in my model, but made changes to make it more compact and easy for 3D printing.
I then used Fusion 360 for all my modeling and a Robo 3D printer to manufacture the pieces.


First Prototype
I began with a single side of the mechanism and a basic frame of the eye. This mainly acted as a proof of concept and to see if I needed to make any modifications to the 3-D model or programming. I wanted to make the mechanism compact, so I designed the control points to be within the frame of the eye rather than on the exterior like I had seen in some references online.
For horizontal rotation, I designed a central axle with a mounting position left-of-center for a control rod to have leverage and control the rotation. This axle's geometry was designed to fit inside the circular frame in a way that allows the frame to rotate separately in the vertical direction, while keeping it from sliding to the left or right. For the vertical rotational control, I designed a control point directly above the central pivot point on its own axle to provide leverage.
One problem I encountered was the size of the pieces restricting the eye from moving at some angles. This was solved by reducing the size and geometry in CAD, reprinting the pieces, and adding limits to the servo rotation.
Second Prototype
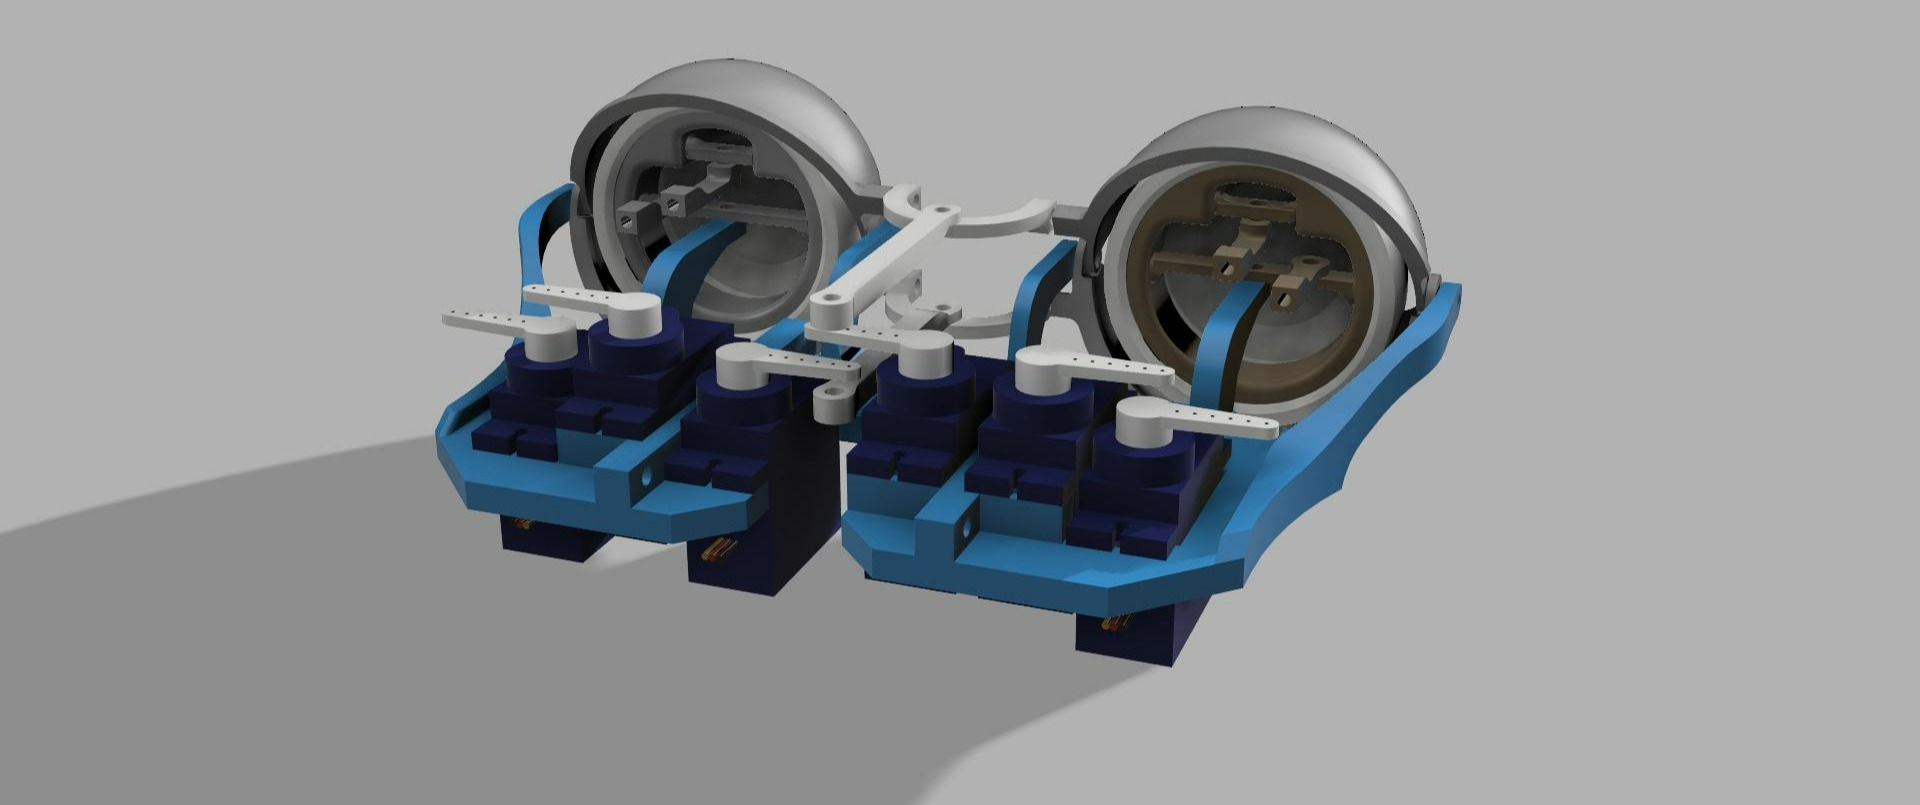
The second prototype involved adding the other eye, which was a mirrored copy of the left side. After adding the second eye, I recognized a few more issues. The vertical rotation for both eyes was the same, so I didn't have to modify the controls for that axis. For the horizontal rotation, the servo positions were mirrored on the base plate, which meant the leverage point on the eye's frame was on the opposite side and would cause rotation in the wrong direction when given the same input. Because of this, I had to change the programming to invert the rotation of the second eye. This prototype finished the basic functionality of the design so that I could focus mainly on the look of the eyes as I continued.

Third Prototype
For the third iteration, I added the eyes' exterior facade and the eyelid mechanism. I mounted the facade onto the inner frame via a friction fit without affecting the mechanism's functionality, so I had to print the piece multiple times to find the right tolerance. The eyelids were an issue mostly due to how thin they were, which made it difficult to 3-D print them. After making the pieces a bit thicker and adding a wider base for the first layers, I didn't have many 3-D printing issues and went on to assembling the design. For this prototype, I programmed the eyelids to have a certain percentage chance of blinking each time the program loops. The blinking could also be controlled by pressing the joystick inwards to close the eyelids. This functionality was later changed to entirely random intervals to allow the joystick to switch between controlled or random motion.
Final Design
The final design did not change much from the third prototype. I made minor changes in geometry and reprinted some of the control rods, but the major changes were in the programming. I replaced the manually controlled motion with a mixture of randomized and manual control. Now, by pressing the joystick inward, you can switch between random and controlled motion. I also changed the eyelids so that they slightly follow the motion of the eye when looking up or down. This small change made the motion look more dynamic and realistic. The blinking percentage was also decreased so that it better matches the interval at which people blink.
There are some modifications that I hope to make in the future, such as tighter tolerances between parts and troubleshooting the code to have fewer glitches. I also believe that the electronics draw too much power all at once, which could be causing the glitches, so I would need to solve that issue as well.